

Why Nmap?
Nmap (Network Mapper) is one of the most powerful tools in cybersecurity. Beginners often see complex commands and feel lost. The goal here is to break down each command piece by piece, so you understand not just what to type, but why it works.
First Command: Basic Host Discovery
nmap <target>
Explanation:
- nmap → This is the tool itself. Typing nmap tells your system you want to run the Network Mapper program.
- <target> → Replace this with the IP address or domain name you want to scan.
- Example: nmap 192.168.1.1
- Example: nmap scanme.nmap.org
This simplest form of Nmap checks if the target is alive and responds. It doesn’t dive into ports or services yet, it’s just saying: “Hey, are you there?”
Why it matters:
Before running deeper scans, you need to confirm the host is reachable. Think of it like knocking on someone’s door before asking questions.
Scanning Ports
Command: Scan the Top 1000 Ports:
nmap <target>
Explanation:
- You’ve already seen this command above. By default, Nmap doesn’t just check if the host is alive, it also scans the most common 1000 TCP ports.
- Ports are like doors into a computer. Each port corresponds to a service (e.g., web server, email server, FTP). Example: Port 80 → HTTP (web traffic) and Port 443 → HTTPS (secure web traffic)
What happens:
When you run nmap scanme.nmap.org, for example, or any target domain or IP, Nmap will:
- Knock on the 1000 most popular doors (ports).
- Report which ones are open, closed, or filtered (blocked by firewall).
Command: Scan All 65,535 Ports:
nmap -p- <target>
Explanation:
- -p- → This tells Nmap to scan all ports (from 1 to 65,535).
- <target> → Same as before, the IP or domain you want to scan.
Why it matters:
- Sometimes attackers (or administrators) hide services on unusual ports (e.g., 8080, 2222, 3306).
- Scanning all ports ensures you don’t miss anything.
Command: Scan Specific Ports:
nmap -p 22,80,443 <target>
Explanation:
- -p → Port specification option.
- 22,80,443 → You’re telling Nmap: “Only check SSH (22), HTTP (80), and HTTPS (443).”
- <target> → The system you’re scanning.
Why it matters:
- Saves time when you only care about certain services or ports.
- Useful for quick checks on web servers or SSH‑enabled machines.
Service & Version Detection
Command: Detect Services and Versions:
nmap -sV <target>
Explanation:
- -sV → This option enables service/version detection.
- <target> → The IP or domain you’re scanning.
What it does:
- Nmap probes each open port to figure out which service is running (e.g., Apache, Nginx, OpenSSH).
- It also tries to identify the version number (e.g., Apache 2.4.41, OpenSSH 8.2).
Why it matters:
- Knowing the exact version helps you assess vulnerabilities.
- Example: If a server is running OpenSSH 7.2, you can check if that version has known exploits.
Command: Aggressive Scan (Includes Service Detection):
nmap -A <target>
Explanation:
-A → Aggressive mode. It combines multiple features:
- Service/version detection (-sV)
- OS detection (-O)
- Script scanning (–script)
- Traceroute
Why it matters:
- This is a powerful all‑in‑one scan for reconnaissance.
- It gives you a detailed snapshot of the target system in one command.
⚠️ Note: Because it’s aggressive, it’s noisier and more likely to be noticed by intrusion detection systems (IDS). Use carefully.
Example Output (simplified):
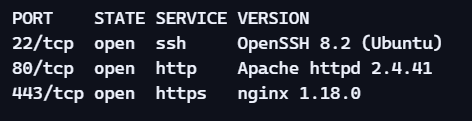
This tells you:
- Port 22 → SSH service, version 8.2
- Port 80 → Apache web server, version 2.4.41
- Port 443 → Nginx web server, version 1.18.0
Operating System (OS) Detection
Command: Detect the Operating System
nmap -O <target>
Explanation:
- -O → Enables OS detection.
- <target> → The IP or domain you’re scanning.
What it does:
- Nmap analyzes responses from the target (like TCP/IP stack behavior, packet signatures, and timing).
- It compares these patterns against its database to guess the operating system (e.g., Linux kernel 5.x, Windows 10, FreeBSD).
Why it matters:
- Identifying the OS helps in vulnerability assessment.
- Example: If you know the target runs Windows Server 2012, you can check for unpatched exploits specific to that OS.
Command: Combine OS Detection with Service Detection
nmap -O -sV <target>
Explanation:
- -O → OS detection.
- -sV → Service/version detection.
- Together, they give you both the operating system and the services/versions running.
Why it matters:
- This combination provides a full profile of the target system.
- Example output might show:
- OS: Linux kernel 5.4 (Ubuntu)
- Services: Apache 2.4.41, OpenSSH 8.2
Example Output (simplified):

This tells you:
- The target is running Linux, kernel version between 5.4 and 5.8.
- It’s only 1 hop away (directly reachable without intermediate routers).
Nmap Scripting Engine (NSE)
What is NSE?
The Nmap Scripting Engine allows you to run pre‑built scripts that extend Nmap’s functionality. These scripts can:
- Detect vulnerabilities (e.g., Heartbleed, SMB flaws).
- Gather extra information (e.g., SSL certificate details).
- Automate tasks (e.g., brute‑force login attempts, though only in authorized testing).
Think of NSE as Nmap’s “plugins”, they add intelligence to your scans.
Command: Run Default Scripts
nmap -sC <target>
Explanation:
- -sC → Runs the default set of scripts included with Nmap.
- <target> → The IP or domain you’re scanning.
What it does:
- Default scripts check for common issues like SSL/TLS configuration, HTTP titles, and basic vulnerabilities.
- It’s safe and quick — a good starting point for beginners.
Command: Run Specific Script
nmap –script=http-title <target>
Explanation:
- –script= → Lets you specify which script to run.
- http-title → This script grabs the title of a webpage hosted on the target.
- <target> → The system you’re scanning.
Why it matters:
- Useful for quickly identifying web applications.
- Example: If port 80 is open, this script might return “Welcome to Apache” or “Login Portal.”
Command: Run Multiple Scripts
nmap –script=http-title,ssl-cert <target>
Explanation:
- http-title → Gets the webpage title.
- ssl-cert → Retrieves SSL certificate details (issuer, expiration date).
- Running them together saves time and gives richer output.
Command: Run Vulnerability Category Scripts
nmap –script vuln <target>
Explanation:
- vuln → Runs all scripts in the “vulnerability” category.
- These scripts check for known weaknesses (e.g., outdated software, misconfigurations).
⚠️ Note: This is more intrusive than default scripts. Use responsibly and only on systems you’re authorized to test.
Example Output (simplified)
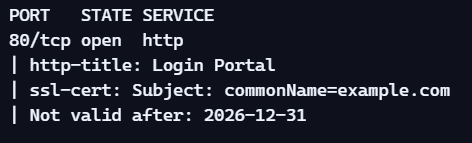
This tells you:
- Port 80 is open with a web login portal.
- SSL certificate is valid until December 31, 2026.
Timing & Stealth Options
Command: Control Scan Speed
nmap -T4 <target>
Explanation:
-T4 → Timing template. Nmap has six timing levels:
- -T0 → Paranoid (very slow, avoids detection).
- -T1 → Sneaky (slow, stealthy).
- -T2 → Polite (slower, uses less bandwidth).
- -T3 → Normal (default).
- -T4 → Aggressive (fast, more detectable).
- -T5 → Insane (very fast, very noisy).
<target> → The IP or domain you’re scanning.
Why it matters:
- Faster scans (-T4, -T5) are great for speed but can trigger firewalls or IDS.
- Slower scans (-T0, -T1) are stealthier but take much longer.
Command: Stealth Scan (SYN Scan)
nmap -sS <target>
Explanation:
- -sS → SYN scan, also called “half‑open” scan.
- Instead of completing the full TCP handshake, Nmap sends a SYN packet and waits for a response.
- If the port replies with SYN‑ACK → it’s open.
- If it replies with RST → it’s closed.
Why it matters:
- Stealthier than a full connect scan (-sT).
- Often bypasses logging because the connection never fully establishes.
Command: Avoid DNS Resolution
nmap -n <target>
Explanation:
- -n → Tells Nmap not to resolve hostnames into IP addresses.
- This saves time and avoids extra DNS traffic.
Why it matters:
- Faster scans when you already know the IP.
- Reduces noise in logs (no DNS lookups recorded).
Command: Randomize Scan Order
nmap –randomize-hosts <target1> <target2> <target3>
Explanation:
- –randomize-hosts → Randomizes the order in which hosts are scanned.
- Useful when scanning multiple targets to avoid predictable patterns.
Example Use Case
nmap -sS -T2 -n <target>
- SYN scan (-sS) → stealthy.
- Timing level 2 (-T2) → polite, slower, less noisy.
- No DNS resolution (-n) → faster and cleaner.
Output Options
Command: Save Output to a Text File
nmap <target> -oN results.txt
Explanation:
- -oN → Normal output format (human‑readable).
- results.txt → The file name where results will be saved.
- <target> → The IP or domain you’re scanning.
Why it matters:
- Keeps a permanent record of your scan.
- Useful for later comparison (e.g., checking if new ports opened after updates).
Command: Save Output in XML Format
nmap <target> -oX results.xml
Explanation:
- -oX → XML output format.
- results.xml → File name for the XML report.
Why it matters:
- XML is machine‑readable.
- You can import results into other tools (like vulnerability scanners or dashboards).
Command: Save Output in Grepable Format
nmap <target> -oG results.gnmap
Explanation:
- -oG → Grepable output format.
- results.gnmap → File name for the grepable report.
Why it matters:
- Useful for scripting and automation.
- You can quickly filter results using grep or other command‑line tools.
Command: Save Output in All Formats
Explanation:
- -oA → Saves results in all formats (Normal, XML, Grepable).
- results → Base name; Nmap will create results.nmap, results.xml, and results.gnmap.
Why it matters:
- Best practice when you’re not sure which format you’ll need later.
- Ensures compatibility with both human review and automated tools.
Example Workflow
If you’re scanning a web server and want to keep a full record:
nmap -sV -O -oA webserver_scan 192.168.1.10
- Service detection (-sV)
- OS detection (-O)
- Save results in all formats (-oA)
- Target: 192.168.1.10
This gives you a complete profile of the system and saves it for future analysis.
Reach out to us today (XEye Academy) — we provide private trainings with real‑world simulated labs, guided by certified expert instructors, to help you master Nmap, penetration testing, and cybersecurity.
Practical Examples & Use Cases
Example 1: Scanning Your Own Network Safely
nmap -sV -O -oA mynetwork_scan 192.168.1.0/24
- -sV → Detect services and versions.
- -O → Detect operating systems.
- -oA mynetwork_scan → Save results in all formats.
- 192.168.1.0/24 → Scan the entire local subnet (all devices on your home/office network).
✅ Use case: Identify all devices connected to your Wi‑Fi, what services they’re running, and keep a record.
Example 2: Web Server Audit
nmap -p 80,443 –script=http-title,ssl-cert scanme.nmap.org
- -p 80,443 → Only scan web ports.
- –script=http-title,ssl-cert → Grab the webpage title and SSL certificate details.
- scanme.nmap.org → Target domain.
✅ Use case: Quickly check if a web server is running properly and whether its SSL certificate is valid.
Example 3: Stealthy Reconnaissance
nmap -sS -T2 -n target.com
- -sS → SYN (stealth) scan.
- -T2 → Polite timing (slower, less detectable).
- -n → Skip DNS resolution.
✅ Use case: Perform a quieter scan that’s less likely to trigger alarms on intrusion detection systems.
Example 4: Vulnerability Check
nmap –script vuln 192.168.1.50
- –script vuln → Run all vulnerability scripts.
- 192.168.1.50 → Target IP.
✅ Use case: Check a specific host for known vulnerabilities before deploying it in production.
Example 5: Full Audit for Reporting
nmap -A -p- -oA full_audit target.com
- -A → Aggressive scan (services, OS, traceroute, scripts).
- -p- → Scan all 65,535 ports.
- -oA full_audit → Save results in all formats.
✅ Use case: Comprehensive scan for penetration testing or compliance documentation.
Best Practices & Safety Tips
Always Scan What You Own (or Have Permission For)
- Rule #1: Never scan random websites or networks without explicit permission.
- Unauthorized scanning can be considered illegal or malicious activity.
- ✅ Safe practice: Use Nmap on your own home/office network or in lab environments.
2. Document Everything
- Keep records of your scans (use -oA for all formats).
- Helps track changes over time (e.g., new services appearing).
- Provides evidence for compliance or security audits.
3. Start Small, Then Go Deep
- Begin with simple scans (nmap <target>).
- Progress to detailed scans (-sV, -O, –script vuln) only when needed.
- This avoids overwhelming yourself and reduces unnecessary noise on the network.
4. Respect Timing & Stealth
- Use slower timing (-T2, -T1) when scanning sensitive systems.
- Faster scans (-T4, -T5) are fine for your own lab but can trigger alarms in production.
- Balance speed with stealth depending on the environment.
5. Combine Nmap with Other Tools
- Nmap is great for discovery, but not a full vulnerability scanner.
- Pair it with tools like OpenVAS, Nessus, or Metasploit for deeper analysis.
- Think of Nmap as your map, and other tools as your compass.
6. Stay Updated
- Nmap regularly updates its scripts and detection database.
- Always use the latest version to ensure accurate results.
- Run: nmap –script-updatedb to refresh your script database.
7. Ethical Mindset
- Treat Nmap as a learning and security tool, not a hacking weapon.
- The goal is to protect systems, not exploit them.
- Build habits of responsible scanning early — it will serve you well in professional cybersecurity roles.




 Google